|
|
|||||||
| The Outpost This forum is dedicated to all who share a love for, and a desire to make good knives, and have fun doing it. We represent a diverse group of smiths and knifemakers who bring numerous methods to their craft. |
 |
|
|
Thread Tools | Display Modes |
|
#1
 06-23-2007, 09:12 PM
|
||||
|
||||
|
New vertical forge
Made from an 80 gallon compressor tank that I shortened by two feet. It is lined with Minrox MX refractory cement which is rated for 3000 Deg (F). The lid comes off so I can smelt and cast with it also. The blower is 90 CFM through 1 1/2" pipe and controlled with a gate valve. Tomarrow I will wire in an electronic speed control and see how that works. If it allows very fine air flow control then I will remove the gate valve since it does restrict some air even when it is wide open.
The forge weighs 250 Lbs 200 of that is just the refractory (4 50 Lbs. bags used). It has a sliding/adjustable tool rest. 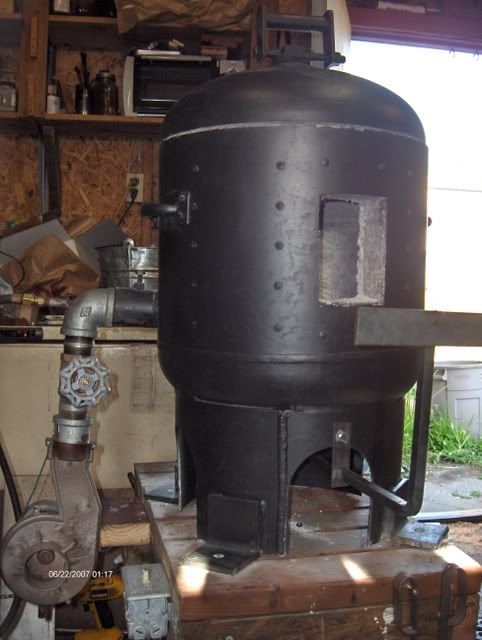 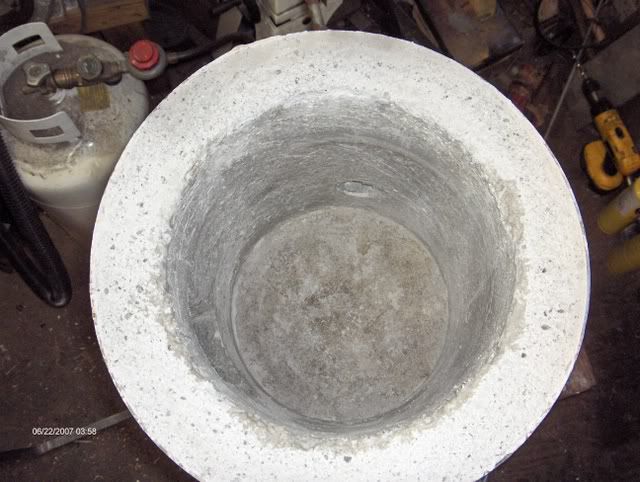
Last edited by B.Finnigan; 06-24-2007 at 10:29 AM. 
|
|
#3
06-23-2007, 10:55 PM
|
|||
|
|||
|
hot ding dangit!
could I bug ya for some sort o schematics?
|
|
#4
06-23-2007, 11:18 PM
|
||||
|
||||
|
I don't have any schematics but I can describe all the processes in building it. It probably would have been easier and faster if I had both of my eyes but that is another story.
 It is the most expensive forge I have built so far, $332 just for the refractory. But I am tired of messing around with ceramic wool and that extremely overrated ITC 100 that wants to melt at welding temps. The burner inlet sleeve is super corrosion resistant stainless steel and 2"x12" piece cost $82. But I only needed 6" so I have a replacement chunk if needed. Last edited by B.Finnigan; 06-24-2007 at 01:15 AM.
|
|
#5
06-24-2007, 10:32 AM
|
||||
|
||||
|
Very retro, with the curved lines & rivets.

|
|
#6
06-24-2007, 01:30 PM
|
||||
|
||||
|
I used 1 1/2" sheet metal screws to help stabilize the refractory when it gets any cracks. It does have an old boiler look to it with the screws.
I just wired in the electronic speed control and it seems to work. It wants to race a bit towards "high" and there is some delay turning it down due to the spool down of the blower motor. I will use it for a few weeks and decide then if I want it in permanent. Now I can remove the gate valve and replace it with a straight pipe with much less resistance. Here is a video of the speed control working. http://www.youtube.com/watch?v=dJpTI...e=user&search= 
|
|
#7
06-24-2007, 03:53 PM
|
||||
|
||||
|
Time to fire it up on medium to drive off any residual moisture that may still be in the refractory.
http://www.youtube.com/watch?v=JkjXY...e=user&search= Update: After coating the inside with APG #36 it will get to forging heat in seven minutes. Before coating it was closer to twenty. Last edited by B.Finnigan; 06-26-2007 at 11:32 AM.
|
|
#8
06-28-2007, 10:11 AM
|
|||
|
|||
|
Cool! It reminds me of the robot from "Lost in Space".

Last edited by Tai Google; 06-28-2007 at 10:14 AM.
|
|
#9
06-28-2007, 07:52 PM
|
||||
|
||||
|
Quote:
Nice looking forge, Brent.
|
|
#10
06-29-2007, 06:42 AM
|
|||
|
|||
|
You are gonna like it, Brian. I think the vertical ones get a much better burn.
I built a similar one several yrs ago from a hot water tank. __________________ I love all of God's creatures, right next to the mashed potatoes and gravy. www.BirdogForge.com
|
|
#11
06-29-2007, 05:19 PM
|
||||
|
||||
|
Thanks! It was fun to build and fiqure out all the obstacles. I no sooner got started on it and I injured my eye spliting firewood. Most of it was built with 80% vision loss in my right eye.
I used a 7 ga bucket as the inner cavity mould. It was coated with parrafin wax but it would not budge after the refractory dried so I had to mangle it to get it out. Tonight I am ging to line the inside with insulwool to make the chamber smaller. It still takes too long to get up to forge heat. The dragons breath has taken out my eyebrows twice now and most of my hair on my forehead. I put a 120 cfm muffin fan under the access hole and that fixed it. It is probably more forge then I need but I could not resist using that compressor tank for something. You know what they say about idle hands. 
|
|
#12
06-30-2007, 08:35 AM
|
||||
|
||||
|
Please let us know how adding the wool affects the time it takes to reach welding temp. I believe it should take less time but there is a school of thought that says it might actually take longer ...
__________________ Your question may already have been answered - try the Search button first!   
|
|
#13
06-30-2007, 09:59 AM
|
||||
|
||||
|
I also coated the ceramic wool with APG 36 that I thinned out w/water to make it a bit easier to apply. The chamber size now is about what it was on my last forge. I do not do much forge welding but I want it to get to forging temps a bit faster.
|
|
#14
06-30-2007, 11:32 AM
|
||||
|
||||
|
I suspect that it will heat up faster but I also think that, if it does, it will probably be because it is a vertical forge. In a horizontal forge, the heat absorbing characteristics of the wool would have more effect than they would in a vertical because the heat in the chamber is reflected from the walls. With a vertical, the heat rises directly from the source ad is merely directed by the walls. In both cases, the walls absorb heat and multiple layers of wool supposedly worsens that situation to an extent that exceeds the benefit of having a smaller chamber. I guess we'll know when you measure your heat up time again...
__________________ Your question may already have been answered - try the Search button first!
|
|
#15
06-30-2007, 12:19 PM
|
||||
|
||||
|
The inner ceramic wool jacket is only 1", I read over on Ed's forum about the testing he did with 1 and 2" wool and the 1" actually heats faster. I was using 2" on my last forge thinking that it would have twice the insulating factor.
Update: I just finished forging with it for an hour and the ceramic wool insert made a huge difference. Within 5 minutes from a cold start I was able to heat up a 1/4x2x12 in. chunk of leaf spring to forge temp. The APG coating was orange within three minutes. The muffin fan allowed me to stand very close w/o any noticable heat. It also kept the tongs at room temp. The wool also cut the deafening roar down by at least 75%, w/o it I had to use hearing protection or I would be dealing with a grinder of a headache. Last edited by B.Finnigan; 06-30-2007 at 01:37 PM.
|
|
| Tags |
| forge, forging |
| Currently Active Users Viewing This Thread: 1 (0 members and 1 guests) | |
|
|


 Linear Mode

