|
|
|||||||
| The Newbies Arena Are you new to knife making? Here is all the help you will need. |
 |
|
|
Thread Tools | Display Modes |
|
#16
 05-06-2007, 07:11 PM
|
||||
|
||||
|
FLAME ON!!!!!!
This time, i fired up the forge and let it run for about 10 mins. You can see it all nice and yellow inside. The next pic is of a pyrometer that i stuck the ceramic end into the forge. After 10 mins, it was holding pretty steady at 1850 degrees. I couldnt shove the thermocouple in any further to check temp in the back, because id melt the wires on it. My propane tank outside has a regulator on it and it is set at 15 psi. Im going to call the gas company and see if i can turn it up to 30 psi. If so, i think with more pressure i can get the temp of the forge up, and ill adjust the temp inside of it by the control valves on the burners. BTW, i still have yet to coat it with ITC-100, so this may bring the temp up, but i am unsure. The second picture is of the pyrometer reading. The last pic is of the forge after it cooled down. I think im just about done with this project, just a few remaining things. Im going to add a idler circut to the propane input to save on gas. I plan to weld a swiveling arm to the left side and hang the pyrometer on it so that i can glance over at it and KNOW what temperature i am forging at. I tried to paint a smiley on the front, but i cant draw a crooked line....sooooo, ill probably just repaint the front black and get rid of it. Thats about all for this project, hope you enjoy looking at it......I sure had fun building it. Blue Skies, Robert 
|
|
#17
05-06-2007, 09:10 PM
|
||||
|
||||
|
I guess it's all right if Alex doesn't shut you down. I don't think pictures loaded this way will stay available forever anyway. Eventually, the thread will be here but the pics will be gone (I think!). You might consider looking for one of those free picture hosting sites that will provide a URL to the picture you store there. That way, you can have as many pics as you want although they'll only hang around for a few weeks in most cases. Or, I think there's some kind of fee you can pay that will let you store all you want here.
Looks like you're making progress but you may have a problem if you plan to weld in this forge. It appears your burners aren't producing enough heat for a forge that size, just as I was afraid might be the case. I'd still get it all put together and try it but my guess is you'll need to pump up your burners or reduce the interior of the forge quite a lot.... __________________ Your question may already have been answered - try the Search button first!   
|
|
#18
05-06-2007, 11:48 PM
|
|||
|
|||
|
Psi
Ray a question if I may.Is there any sort of formula when it comes to heat verses PSI? in that if you went from 10 psi to 20 psi is there a fairley normal % increase or does it just depend on the individual forge?
Cheers KIM
|
|
#19
05-07-2007, 07:46 AM
|
||||
|
||||
|
Well Ray, do you know of some correlation like kim is asking? I just figure that if i turn up the pressure, velocity, that it will increase the output...btu's of the burners. Do you have any idea whether or not the itc100 coating will help? I looked at your website on how you went about built your forge. I saw where you had used a 14 in pipe and later added another 1in kaowool. Mine was only 10in pipe, so i figured i didnt need the other inch. I may have been wrong in this assumption, and ultimately go back and add it. A little wasteful on satanite, but hey, its my first one like this so, theres a learning curve.
Thanks for your help. Blue skies, Robert __________________ Robert Vardaman 2406 Mimosa Lane Hattiesburg, MS 39402 
|
|
#20
05-07-2007, 09:18 AM
|
||||
|
||||
|
I know that the larger the volume of gas that you can burn the hotter the forge will get in a given amount of time. More pressure will deliver more gas but I think there will be a cut off point with an atmospheric burner where you will begin to get too rich a burn due to a lack of sufficient oxygen. In any event, running at higher pressure will increase the cutting action of the hot gasses and substantially increase the cost of running the forge.
When I said it looks like your burners may not get the job done, it is just a guess. Looking at the small flame in the picture compared to the large volume is appears to have to heat it just doesn't look like there will be enough heat. I'm used to looking at my chamber (which is larger) but which is also full of burning gasses as opposed to yours which appears to have a small flame sitting in there. Now, it's true that even a small flame can heat a chamber to a very high temperature if you don't lose heat too rapidly but if the heat source is small then reaching the temperature could take a very long time. And, if you lose too much heat, reaching the temperature might never happen. The bottom line is the more gas you can burn in the shortest length of time will raise the temperature the fastest. The better your insulation the slower you lose heat which means more of whatever heat you have is available to raise the temperature. The smaller the chamber the faster the heat will rise and the easier it will be to maintain a given temperature. It is desirable to accomplish all this at the lowest pressure possible. Everything I have heard says ITC-100 will help. I just added it to my forge but haven't tried it out yet. But, ITC-100 just reflects the heat back into the chamber, helps to keep more heat in the chamber, it doesn't create heat. So, it will help but it may or may not make enough difference to matter in the long run. As I said earlier, I'd finish the forge as you have it designed now, then we'll know. It may turn out my guess is full of gas.  If not, then another layer of wool isn't too expensive or too hard to implement, and, if that should still not be enough, it would be time to consider a different burner... If not, then another layer of wool isn't too expensive or too hard to implement, and, if that should still not be enough, it would be time to consider a different burner...P.S. I just saw your earlier post where you said you measured 1850 F in the forge. That's not too bad, it's enough for forging most steels but you'd probably want more for reliable welding. Anyway, I think I'll stop worryng about your burners. If you can reduce the chamber size I think you'll be fine. You have an 8" interior now, another layer of wool would give you 6" which is more than enough for blades and bigger billets than you can hammer by hand. The ITC on top of that and you should be ready to rock and roll... __________________ Your question may already have been answered - try the Search button first!
Last edited by Ray Rogers; 05-07-2007 at 09:32 AM.
|
|
#21
05-09-2007, 05:16 PM
|
||||
|
||||
|
Ray,
Ive been mulling this over since last sunday, and i think im going to go ahead and put another 1" of kaowool in it to reduce the volume of the chamber. That with satanite and itc100 will probably get me what i want. Originally i was going to use 2"'s, but when putting it in, i thought that looked pretty cramped, so i only went with one. A mistake i think. Im use to the vertical forge, and it has such volume, i thought i would need that....again, i think i am mistaken. I also checked with the propane company on my tank, and it is set at 10 psi. A friend of mine, Moses Schilling, built a forge similar to this, his gets up to about 2200 degrees, and he said that the pressure to his burners is 5psi. Soooooo, im thinking the reason for the difference is the volume im trying to heat up. Ill know this weekend when i have time to redo it and then test it. BTW, any tips on where to get some stainless steel tubes to put the ceramic thermocouple in? I could get some rod and have a friend drill it, but that seems like an awful lot of work. Im sure some company sells something that i can use. I figure i can just tig the end to close it off on the forge side, then slide the thermocouple in. What say ye? blue skies robert __________________ Robert Vardaman 2406 Mimosa Lane Hattiesburg, MS 39402
|
|
#22
05-09-2007, 06:14 PM
|
||||
|
||||
|
The size of the forge could be why Mr Shilling's forge gets hotter than yours but it could also be the burner design (assuming there's any difference). There seems to be a huge variance in performance of different atmospheric burner designs. No matter, if you make the chamber smaller it should get hotter inside.
For the thermocouple wells, I used some 1/2 or 5/8" stainless rod that I cut to about 3" long. I think I got it from Sheffields Knife supply, they sold it for making butt caps. Any steel will do but the stainless will last longer. Anyway, I drilled a hole in it so that the wall thickness was about 1/8" and the hole was a slip fit for my thermocouple. Since this isn't a moving part, it won't matter if the hole is not perfectly centered. Remember to use furnace adhesive to secure the well. That way, it will be easy to remove when you need to replace it. The adhesive is sold anywhere they sell woodstoves or that graphite syuff used to replace worn out wood stove door seals. I think Darren Ellis may sell it too. Heck, I bet you could even use Satanite to hold it in place..... __________________ Your question may already have been answered - try the Search button first!
|
|
#23
05-09-2007, 06:24 PM
|
||||
|
||||
|
Another question Ray,
On the stainless tube you use for the thermocouple, is it closed on the end that is in the forge or is it open? thanks robert __________________ Robert Vardaman 2406 Mimosa Lane Hattiesburg, MS 39402
|
|
#24
05-09-2007, 08:06 PM
|
||||
|
||||
|
Closed. The end is between 1/8 and 1/4" thick.....
__________________ Your question may already have been answered - try the Search button first!
|
|
#25
05-13-2007, 07:16 PM
|
||||
|
||||
|
After I tested the forge as finished at that point, i wasnt happy with the max temp. Ray, i took your advice and put in more kaowool to reduce the volume of the chamber.
The first pic is the second layer of kaowool. I put the satanite on it and let it dry, warmed it one, then fired it up for 15 mins to cure it. I put 2 coats of itc 100 on and let dry. I fired this puppy up and man what a difference. 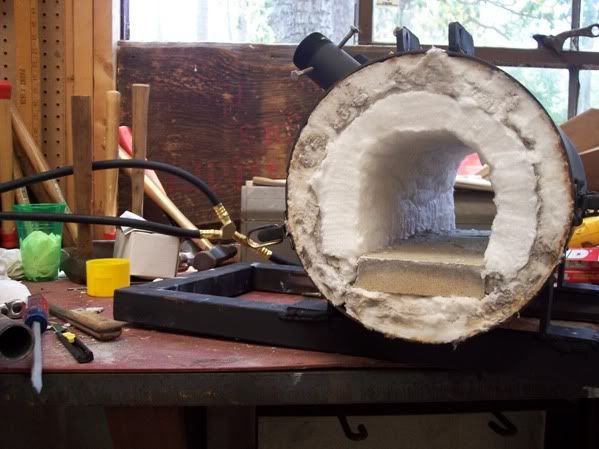 The next pic is where i had cut off a 1/2 in. piece of stainless steel rod and drilled it. Man was that a booger. I was able to drill it about 2ins before it work hardened on me...or at least that what i think happend. I tried annealing it, new drill bits, slow down the press, but in the end, i couldnt drill it any further. 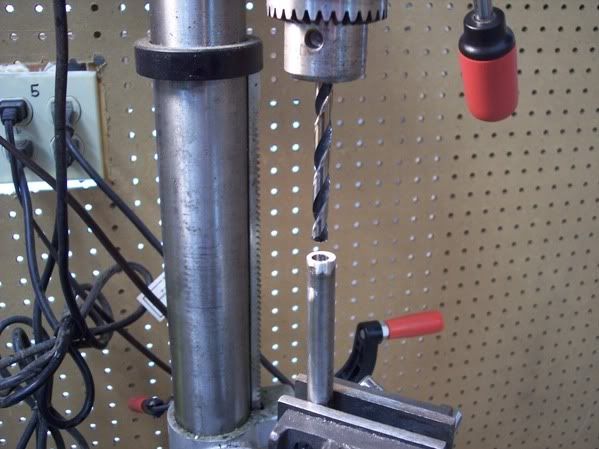 The last pic is showing the thermocouple inserted into the tube. I drilled the forge and put it in. Sealed it all up and fired up the forge. The max reading i could get with this setup was 1200 degrees. When i put the thermocouple in the forge itself it went up to 2050 degrees before i had to pull it out cause i was melting the wires to it. The tube was drilled 2 in from the input side, and then was solid rod for another 2 in. into the forge. I was hoping that the heat would radiate down to the tip of the thermocoupe, but i think i was losing alot inbetween. Im going to order some stainless tubing and then just tig the very end, so that when i put this in the forge, the thermocouple will be inside the forge chamber and just about a 1/8 in from the tip of the tube. When i get this done ill let ya know if this works to give me a more accurate reading. 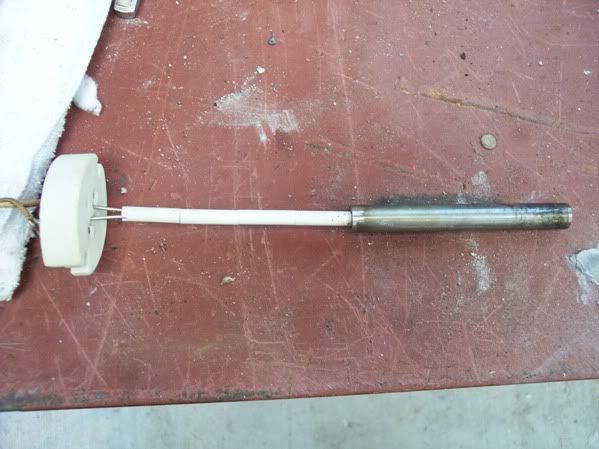 Ray, i also read the tutorial about posting pictures and learned how to upload my pics to a pic hosting site, then link the pics to here so that im not making the forum store the pictures. I think this is a better way to post. Blue skies __________________ Robert Vardaman 2406 Mimosa Lane Hattiesburg, MS 39402
|
|
#26
05-14-2007, 12:18 AM
|
||||
|
||||
|
Hi Robert,
Im not a forge expert by any stretch of the imagination, but I have a few tips that may help you. I've built a forge similar to yours but my shell is 14" in diameter and 24" long with 2" of superwool inside and coated with ITC100. It will reach 2000 degrees F at less than 10 psi. Once the forge is up to temperature, I run it on one burner and it will hold 1800 degrees at about 4-5 psi. I think your problem may be burner size/ design more than anything. My burners are a Rupert Wenig design and are based on a Reil style burner. The burner tubes are 1-1/4" pipe with a #57 drilled orfice. The choke plates I've made for it allow air to enter from the circumfrence of the inlet rather than just one edge, but im not sure that matters. The choke plates are usually only open abit 1/8"-3/16" when the forge is running with a neutral flame. I didnt make burner flares for my burners but instead just shaped the superwool like a flare and coated it with ITC100 to make it hold the shape and just put the tip of the burner barely inside the steel outer forge chamber. This way seems to work quite well and I haven't had any problems with it at all. The tip of the burner pipe does not get hot at all. If I was you I would redesign the angle of your burner entry into the forge and aim them so that they direct the flame across the roof of the forge and make the flame swirl around the inside of the inner chamber. The way you have the burner pointed will lead to a hot spot on the wall across from the burner. You can get better theormocouples for our application from omega.com , you can order them with a 12 or 18 inch stainless or inconel probe. Ive been using the stainless probe in my forge for a while now without a well and it seems to be holding up ok. If I recall correctly the thermocouple was around 30-35 dollars. If you would like to have a look at my forge you can go to my website and have a look on the forge building project page. You will see what I mean about aiming the burners for swirling the flame. This way you get a much more even heat in the forge chamber www.andersonknives.ca __________________ Brad www.andersonknives.ca Available knives http://andersonknives.ca/Available%20Knives.html
|
|
#27
05-14-2007, 08:56 AM
|
||||
|
||||
|
I'm glad to see that it's really starting to come together for you. I agree on the problem with your reading on the thermocouple well, the sensor needs to be within the chamber. If that stainless rod work hardened on you, you might want to use a lubricant next time and slow down your drill press. Mine runs at 250 rpm no matter what I'm drilling (I'm too lazy to change it and this speed works for me). The stainless tubing and the TIG solution should be fine too.....
__________________ Your question may already have been answered - try the Search button first!
|
|
#28
05-14-2007, 09:11 PM
|
||||
|
||||
|
Brad,
Ive been looking at that, and i believe i get what you are saying. By angling the cone further towards the top, i will create more....swirl. Problem i have is that ive already welded the burner tubes that hold the burners in place. The only thing i think to change the angle of attack..(sorry, being a pilot of some years, it is the only desciption i can think of that is close to what i think you are saying).... would be to cut the tube about in half, which might allow the burners to lean more downward, tilting up the end of the burner and the cone flare. I am somewhat hesitant to do this because if it doesnt change it enough, i wont have anything left to hold the burner. Got any other ideas with respect to this? Thanks and Blue Skies __________________ Robert Vardaman 2406 Mimosa Lane Hattiesburg, MS 39402
|
|
#29
05-15-2007, 08:28 AM
|
||||
|
||||
|
How about using an angle grinder to cut the welds off the old tubes and then remount them?
Or, mount another set of tubes next to or below the existing tubes? Or, mount a new set of tubes on the other side of the forge? __________________ Your question may already have been answered - try the Search button first!
|
|
#30
05-15-2007, 09:20 AM
|
||||
|
||||
|
Ray,
Youve followed this from its inception and seen the pictures ive posted. In your opinion, looking at the pics of the forge with the burners going, do i need to re angle them? Certainly i can do what you say, i just didnt want to have to cut the welds and redo them for the obvious reasons. Thanks __________________ Robert Vardaman 2406 Mimosa Lane Hattiesburg, MS 39402
|
|
| Tags |
| blade, forge, forging, knife, knives |
| Currently Active Users Viewing This Thread: 1 (0 members and 1 guests) | |
|
|


 Linear Mode

