|
|
|||||||
| Historical Inspiration This forum is dedicated to the discussion of historical knife design and its influence on modern custom knife work. |
 |
|
|
Thread Tools | Display Modes |
|
#1
 07-30-2004, 11:33 AM
|
|||
|
|||
|
a bit of pattern welding
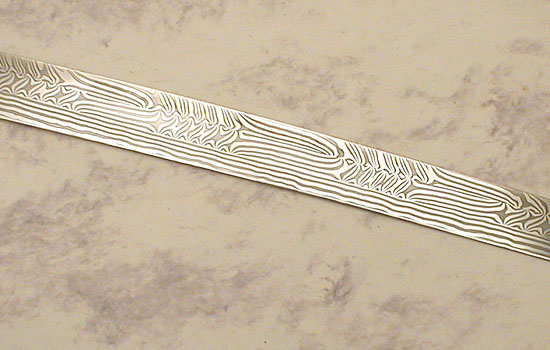
This is my first try at a two-bar interrupted twist pattern. It turned out both better and worse than I expected.
Betters: solid welds, even though the central one should have been ground clean first; good profile; heat treat seems to have turned out just right; good pattern on etching; wicked-sharp edge. Worses: too much scale, I should know better by now; that led to too much filing, leading to a thin edge that got a tiny rippling warp in the quench, but I think I can sharpen it out. Particulars: Materials are antique (40-yr old?) bandsaw blade and new recycled flat spring steel (high-carbon, otherwise composition unknown, probably has some nickel in it). Double quenched in parrafin/animal fat mixture, double tempered an hour each time at 350 degrees F. The blade is about 4 inches long. It's still a long way to Sutton Hoo, but I feel a lot closer now than I was a few weeks ago.  Michael NT smokin' chiken 
|
|
#2
07-30-2004, 12:39 PM
|
||||
|
||||
|
Hey Michael, that's better than my first attempt last week (that billet is now hidden behind some stuff and won't be found until I'm gone and the estate is auctioned off.) You might want to post this thread on the Damascus forum also, lots of help there to. That's a very interesting pattern you got from the twisting. It looks like there arn't many folds, and that when you did fold it, you folded it edge to edge, instead of top to top, etc. Neat work!
__________________ Robert Hensarling Uvalde, Texas
|
|
#3
07-30-2004, 02:53 PM
|
||||
|
||||
|
Cool, nice. In coal?
__________________ "Many are chosen, but few are Pict" "The doer alone, learneth" NT Neo-Devo 
|
|
#5
07-30-2004, 07:48 PM
|
|||
|
|||
|
To follow up on your comments Robert, the edge to edge was trying to make a pattern with lines like on some of the viking and earlier blades. With a little imagination, you can see what I was trying to accomplish: the best example I could find in photos of what I was trying to do is on Jon Loose's page, here, although his has a third bar for the edge and mine doesn't:
 (Jon, thanks again for the inspiration. Please let me know if you don't want me to post your image here, and I'll take it down.) It was two courses of welding, one to make a single bar from the flat pieces that were stacked into a pile about 3/8 to 1/2 inch square, a foot long, and wired together; then I cut off the end that wasn't lined up evenly; twisted the pieces alternating with three straight and two twisted sections on each half; then cut it most of the way through in the middle of the bar, lined up the twisted parts, and did the second welding pass to put the two bars together.
|
|
#6
08-01-2004, 01:30 PM
|
||||
|
||||
|
NO, no... you go right ahead!
 I'm currently working on an interrupted twist edge-wrapped Viking-style dagger & an interrupted twist offset billet. I'll post some pics sometime soon. I've found the key is to work with the twisted rods as small as practical, and to keep *really* good track of twist counts, twisted section lengths & to be consistent, consistent, consistent. That's a great first attempt! I'd say try twisting more. In the piece of mine that you posted the rods were about 3/4" and I twisted a 1" section six times before squaring them, welding together and drawing them out. Did I say keep it consistent?
|
|
#7
08-02-2004, 12:17 PM
|
||||
|
||||
|
Michael,
As I can say from a great deal of recent experiance it is all about learning and trying something new. I can clearly see what you were trying to do. I will be trying my first multi bar pattern soon. And I only hope I do so well as you did. __________________ Scott B. Jaqua http://www.hagersonforge.com http://hagerson.livejournal.com ---------------------------------------------------------------------------------------------- The most important right of all, is that of Free Speech. With out that, all your other rights will soon be taken away. So, I may disagree with what you say, but I will defend until death, your right to say it!
|
|
#8
08-02-2004, 01:21 PM
|
||||
|
||||
|
Cool! Experimentation is half the fun. Be sure and put some pics up of the finished knife.
Everyone must have been think along the same lines....I was messing with a similar billet this past weekend as well. I did the twists and on one section I accidentally gave the bar an extra twist. I mis-measured and one set of twists if offset from the other by 1/2"!  Hopefully I can fix it. Hopefully I can fix it.
__________________ Don "Krag" Halter 
|
|
#9
08-03-2004, 11:49 AM
|
|||
|
|||
|
Thanks everyone for the encouragement. I'll be looking forward to seeing the other projects folks have in progress, and I'll try to get a good photo of this one once I finish it. I'm thinking either horn or maybe black walnut will be part of the handle.
Michael
|
|
#10
08-03-2004, 11:55 AM
|
||||
|
||||
|
A question Michael,
Did you grind or hammer your twisted bars square before you welded them together? __________________ Scott B. Jaqua http://www.hagersonforge.com http://hagerson.livejournal.com ---------------------------------------------------------------------------------------------- The most important right of all, is that of Free Speech. With out that, all your other rights will soon be taken away. So, I may disagree with what you say, but I will defend until death, your right to say it!
|
|
#11
08-08-2004, 08:28 PM
|
|||
|
|||
|
I hammered them square, and I should have ground the edges to be welded but the fire was just right for welding so I didn't want to wait. Hence the dark line in the central weld. I'm guessing that the originals would have been hammered to shape because iron and especially steel were so valuable at the time, but I don't have any idea whether archaeological evidence would back up my guess. Anyone have other thoughts on this?
Jon, you're not kidding about the need to be consistent. I was amazed how difficult it was to keep track of something that sounds as simple as twisting a couple of bars. I think these were one and a half twists over about an inch, and next time I'll try two or three times around in the same distance. Is there any good way to mark the bars to show how long to twist? I'm thinking a dot punched into the bar might work, I'm afraid a line would give it a good place to shear off during the twist and I think a soapstone mark would quickly scale off. It's hard to keep the twisted and straight lengths consistent between the two pieces without any marks.
|
|
#12
08-09-2004, 10:32 AM
|
||||
|
||||
|
Quote:
Also on something like a sword, I don't think material cost is as much an issue as it is on more utilitarian objects. Also my own experiance and the writing of Dr Jim support grinding as well. In working the star twist patted I can see how hammering changes the pattern (compressing the twists and thus forming the stars). And according to Jim's books maidens hair patterns (just a sraight twist, no stars) are made by either twisting the bar in the round and then squaring it up, or grinding the bar flat before drawing it out. The thing is, every hammer blow changes the pattern. In lining up your twists, I figure you want to avoid any more hammer blows then are absolutly needed. And thus avoid deforming (stretching) your twists unevenly. I'm going to try grinding my twisted bars square. I am aware how much material (sweat and labor to make it, not cost) I'll be wasting. But that seems a small token to pay to get the resault I'm after. I have my billets stacked and wired. Once a few other projects are put to bed, I share my results here as well. __________________ Scott B. Jaqua http://www.hagersonforge.com http://hagerson.livejournal.com ---------------------------------------------------------------------------------------------- The most important right of all, is that of Free Speech. With out that, all your other rights will soon be taken away. So, I may disagree with what you say, but I will defend until death, your right to say it!
|
|
#13
08-09-2004, 04:27 PM
|
||||
|
||||
|
I usually weld my billets at 12 layers, forge round but leave a slight flat so it is easier to see the twisting. I also always put the billet in the vise so that the layers are parallel to the vise edges rather than perpendicular. I like to think this helps keep them from separating. I then use a very large pipe-wrench with a handle welded onto the business end and carefully place it also parallel to the layers and thus it is easy to count twists and align them again if necessary for interrupts. I then forge roughly square (which is also a good way to make up for any uneven lengths if there are interrupts,) then grind very square for the welding together of the rods. So far so good.

|
|
#14
08-09-2004, 04:40 PM
|
||||
|
||||
|
Quote:
How hard it it to forge the welded billet round? Also I figure in doing that you are compressing the outside edges of your upper most and lower most layers. How does that alter the patter when you forge it back square? Because after the twist you aren't just returning the altered layers back to the same perportions. I mean if it works for you, then I'm all for it in that saves a lot of material. But I like to know how things work
__________________ Scott B. Jaqua http://www.hagersonforge.com http://hagerson.livejournal.com ---------------------------------------------------------------------------------------------- The most important right of all, is that of Free Speech. With out that, all your other rights will soon be taken away. So, I may disagree with what you say, but I will defend until death, your right to say it!
|
|
| Tags |
| blade, forge, knife |
| Currently Active Users Viewing This Thread: 1 (0 members and 1 guests) | |
|
|


 Linear Mode

