| The Sheath/Holster Makers Forum This is the place to discuss all forms of sheath and holster making. |

11-09-2008, 08:13 PM
|
 |
Steel Addict
|
|
Join Date: Dec 2007
Location: Stillman Valley, IL
Posts: 113
|
|
 When to wet form??? (with pics)
I am trying my hand for the first time at making a sheath for my kit knife. I cut out the leather and the spacer piece (forgot term) that goes along the edge to be sewed. Should I sew it first or wet form it first? I seen it done both ways and was curious as to which is preferred.
Thanks Chris
I don't really have any leather tools yet, the bent razor blade in the pic is my skive.


Last edited by cwiehle0; 11-10-2008 at 07:51 AM.
|
11-10-2008, 01:14 PM
|
|
Steel Addict
|
|
Join Date: Dec 2007
Location: Stillman Valley, IL
Posts: 113
|
|
|
Anyone??? Is this forum a dead zone?
|
11-10-2008, 01:19 PM
|
|
|
|
Join Date: Jul 2008
Posts: 1
|
|
|
I'm a newbie at this myself but I usually sew last. I do a casing of the leather first, then fit the welt to the blade.
|
11-10-2008, 01:35 PM
|
|
Steel Addict
|
|
Join Date: Jan 2003
Location: Ont Canada
Posts: 227
|
|
Quote:
|
Originally Posted by cwiehle0
Anyone??? Is this forum a dead zone?
|
We're all volunteers. For $50/hr I'll hop to it.
__________________
Sheath dude
Ontario Canada
|
11-10-2008, 01:44 PM
|
|
Steel Addict
|
|
Join Date: Jan 2003
Location: Ont Canada
Posts: 227
|
|
Quote:
|
Originally Posted by pete494
I'm a newbie at this myself but I usually sew last. I do a casing of the leather first, then fit the welt to the blade.
|
I'm an oldbie (27 years of sheaths) and also sew last too. It's the only way the welt can be made a perfect fit to the blade (in my opinion anyway).
This is the order I do 'em - cut out, dye, make welt 1/4" wider than the original paper pattern, soak sheath body, fold, mould, let dry, insert knife, snug welt up to it, mark welt with pen so it can be re-inserted again, remove knife, glue one side of welt and sheath, apply welt to pen lines, glue other side of welt and sheath, stick, trim all three thicknesses with knife, grind, sand, polish.
__________________
Sheath dude
Ontario Canada
|
11-10-2008, 01:50 PM
|
|
Steel Addict
|
|
Join Date: Dec 2007
Location: Stillman Valley, IL
Posts: 113
|
|
Quote:
|
Originally Posted by Mike T.
I'm an oldbie (27 years of sheaths) and also sew last too. It's the only way the welt can be made a perfect fit to the blade (in my opinion anyway).
This is the order I do 'em - cut out, dye, make welt 1/4" wider than the original paper pattern, soak sheath body, fold, mould, let dry, insert knife, snug welt up to it, mark welt with pen so it can be re-inserted again, remove knife, glue one side of welt and sheath, apply welt to pen lines, glue other side of welt and sheath, stick, trim all three thicknesses with knife, grind, sand, polish.
|
Thanks to Mike T and the newbie. I'll give it a shot tonight or tomorrow.
Chris
|
11-10-2008, 03:16 PM
|
|
Steel Addict
|
|
Join Date: Dec 2007
Location: Stillman Valley, IL
Posts: 113
|
|
Quote:
|
Originally Posted by Mike T.
I'm an oldbie (27 years of sheaths) and also sew last too. It's the only way the welt can be made a perfect fit to the blade (in my opinion anyway).
This is the order I do 'em - cut out, dye, make welt 1/4" wider than the original paper pattern, soak sheath body, fold, mould, let dry, insert knife, snug welt up to it, mark welt with pen so it can be re-inserted again, remove knife, glue one side of welt and sheath, apply welt to pen lines, glue other side of welt and sheath, stick, trim all three thicknesses with knife, grind, sand, polish.
|
I don't understand why the welt should be cut 1/4" wider. The welt in the pic was cut and traced right from the edge of the pattern so it is the same size. Am I misunderstanding you? Also, can I get the dyes at wal mart, jo ann fabrics , or michaels, or is it special stuff I have to order?
Thanks Chris
|
11-10-2008, 04:15 PM
|
|
Steel Addict
|
|
Join Date: Jan 2003
Location: Ont Canada
Posts: 227
|
|
Quote:
|
Originally Posted by cwiehle0
I don't understand why the welt should be cut 1/4" wider. The welt in the pic was cut and traced right from the edge of the pattern so it is the same size. Am I misunderstanding you?
|
A picture's worth a 1000 words but a couple of dozen are going to have to suffice here. If the welt is the same size as its paper pattern then, when it's snugged up to the blade, there's nothing sticking out of the body flaps of the sheath to mark for subsequent insertion. And as we're doing this exercise to get a perfect welt-to-blade fit (or at least I am anyway) then if the welt is a bit "inside" the flaps we've no way of placing it back in its perfect spot ever again. I place the knife in the folded leather, insert the (oversize) welt, snug it perfectly to the blade, trace around the edges of the body flaps (onto the welt) with a ballpen and remove the welt. Now, when I remove the welt to glue it, I know EXACTLY where to place it when I'm contact-cementing it in place. Otherwise, how do I know where to replace it when glueing it in?
Quote:
|
Also, can I get the dyes at wal mart, jo ann fabrics , or michaels, or is it special stuff I have to order?
|
I'm sure you can get some kind of dye from those places but leather dye won't be one of them. Look up Feibing's leather dyes (I use their spirit dye, some use oil) and Tandy Leather.
__________________
Sheath dude
Ontario Canada
Last edited by Mike T.; 11-10-2008 at 04:20 PM.
|
11-10-2008, 04:59 PM
|
|
Skilled
|
|
Join Date: Jun 2007
Location: Runaway Bay, Texas
Posts: 664
|
|
|
Sometimes Michaels, one of those craft shops, have some dyes for leather. I have seem them in that section, just never paid any attension to what brand they were. Good luck.
|
11-10-2008, 08:49 PM
|
|
Steel Addict
|
|
Join Date: Dec 2007
Location: Stillman Valley, IL
Posts: 113
|
|
Quote:
|
Originally Posted by Mike T.
A picture's worth a 1000 words but a couple of dozen are going to have to suffice here. If the welt is the same size as its paper pattern then, when it's snugged up to the blade, there's nothing sticking out of the body flaps of the sheath to mark for subsequent insertion. And as we're doing this exercise to get a perfect welt-to-blade fit (or at least I am anyway) then if the welt is a bit "inside" the flaps we've no way of placing it back in its perfect spot ever again. I place the knife in the folded leather, insert the (oversize) welt, snug it perfectly to the blade, trace around the edges of the body flaps (onto the welt) with a ballpen and remove the welt. Now, when I remove the welt to glue it, I know EXACTLY where to place it when I'm contact-cementing it in place. Otherwise, how do I know where to replace it when glueing it in?
I'm sure you can get some kind of dye from those places but leather dye won't be one of them. Look up Feibing's leather dyes (I use their spirit dye, some use oil) and Tandy Leather.
|
That makes sense. I'll cut a ne wwelt. Thank you.

|
11-10-2008, 09:31 PM
|
|
Steel Addict
|
|
Join Date: Jan 2003
Location: Ont Canada
Posts: 227
|
|
Quote:
|
Originally Posted by cwiehle0
That makes sense. I'll cut a ne wwelt. Thank you.
|
Here's the pic that's worth a 1000 words -
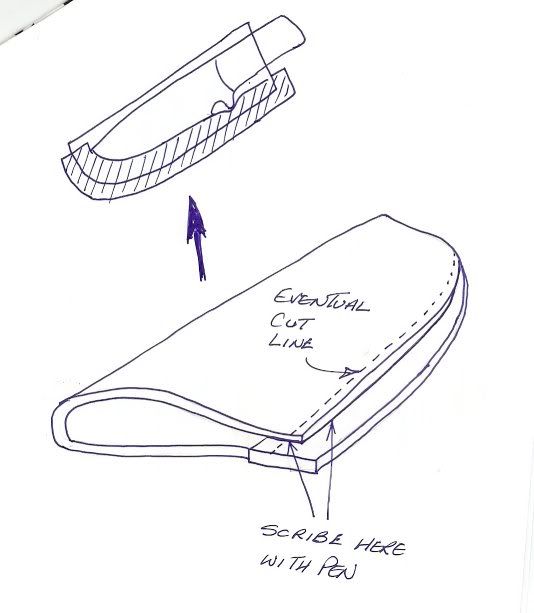
Fit welt snug to blade, scribe around sheath flaps onto welt (both sides), remove knife and welt. Now, with contact cement applied (one side at a time) we can cement the welt in exactly the right place for a perfect fit.
How's that?
__________________
Sheath dude
Ontario Canada
Last edited by Mike T.; 11-10-2008 at 09:36 PM.
|
11-11-2008, 06:07 AM
|
 |
Moderator
|
|
Join Date: Sep 2002
Location: Acworth, GA and/or Hanging Dog, NC
Posts: 3,584
|
|
|
Great advice Mike. I've always cut my welts a little "tight" which always made things a bit exacting on glue-up (got a hate waste thing stuck in my mind over the manyyears). Cutting a little extra off is much better than having to pull apart and cutting a new one.
Michaels and Hobby Lobby used to carry Feibings but they have pretty much gone to the Tandy's All-in-one dye/finish. An abomination on a grand scale if you ask me. Tandy still sells Feibings but seems to be restocking more and more with the All-in-one (even at the main store in Chattanooga). The AIO colors suck!
The big leather suppliers carry Feibings in large and small containers (see sticky above).
__________________
Carl Rechsteiner, Bladesmith
Georgia Custom Knifemakers Guild, Charter Member
Knifemakers Guild, voting member
Registered Master Artist - GA Council for the Arts
C Rex Custom Knives
Blade Show Table 6-H
|
11-11-2008, 07:04 AM
|
|
Steel Addict
|
|
Join Date: Dec 2007
Location: Stillman Valley, IL
Posts: 113
|
|
Quote:
|
Originally Posted by Mike T.
Here's the pic that's worth a 1000 words -
Fit welt snug to blade, scribe around sheath flaps onto welt (both sides), remove knife and welt. Now, with contact cement applied (one side at a time) we can cement the welt in exactly the right place for a perfect fit.
How's that? |
Thanks sheath dude that helped a lot. I cut a new welt last light before wet forming it. The new welt is much better but still not exactly tight to the knife. I don't think it will matter much because I check it this morning and the leather formed pretty close around the knife.
I don't know what you guys use to squish the wet leather around your knife. The only thing I have layin' around was one of them yellow 6' long swimming pool noodles that I cut 6" off of then sliced down the middle and clamped in a vice with some boards on either side for added support. It seemed to work pretty good.
Thanks again. I try and post some pics of my abominatoin when I am done. Be nice!!
|
11-11-2008, 10:20 AM
|
|
Moderator
|
|
Join Date: Nov 2006
Location: Atlanta metro area (Sugar Hill)
Posts: 266
|
|
Quote:
|
Originally Posted by cwiehle0
I don't know what you guys use to squish the wet leather around your knife.
|
Use your fingers to mold the leather to the blade and handle. Any 'smooth and polished object' will work also, such as the smooth handle end of a table knife, spoon, smooth piece of wood, end of a hair brush, bottom of a shot glass, etc... The benefit of fingers is that it minimizes the transfer of any marks (scrape, gouge or cut) to the wet leather and you never lose them on the bench under the clutter. Additionally, the smoother curves imparted by fingers are more attractive than a 'skin tight' fit which has sharper angles.
|
11-11-2008, 11:16 AM
|
|
Steel Addict
|
|
Join Date: Jan 2003
Location: Ont Canada
Posts: 227
|
|
Quote:
|
Originally Posted by RandyScott
Use your fingers to mold the leather to the blade and handle. Any 'smooth and polished object' will work also, such as the smooth handle end of a table knife, spoon, smooth piece of wood, end of a hair brush, bottom of a shot glass, etc... The benefit of fingers is that it minimizes the transfer of any marks (scrape, gouge or cut) to the wet leather and you never lose them on the bench under the clutter. Additionally, the smoother curves imparted by fingers are more attractive than a 'skin tight' fit which has sharper angles.
|
What I do is to first wet mold with the fingers making sure NOT to impart any fingernail marks to the leather or they will be there forever. Then I use the plastic covered leg of a small pair of pliers to tuck the leather even tighter then I finish off with a Tandy bone folder.
__________________
Sheath dude
Ontario Canada
|
|
Currently Active Users Viewing This Thread: 1 (0 members and 1 guests)
|
|
|
 Posting Rules
|
You may not post new threads
You may not post replies
You may not post attachments
You may not edit your posts
HTML code is On
|
|
|
All times are GMT -5. The time now is 04:07 AM.
|


 Linear Mode
