|
|
|||||||
| Register | All Photos | FAQ | Members List | Calendar | ShopStream (Radio/TV) | Search | Today's Posts | Mark Forums Read |
| The Newbies Arena Are you new to knife making? Here is all the help you will need. |
 |
|
|
Thread Tools | Display Modes |
|
#1
 06-11-2012, 07:20 PM
|
|||
|
|||
|
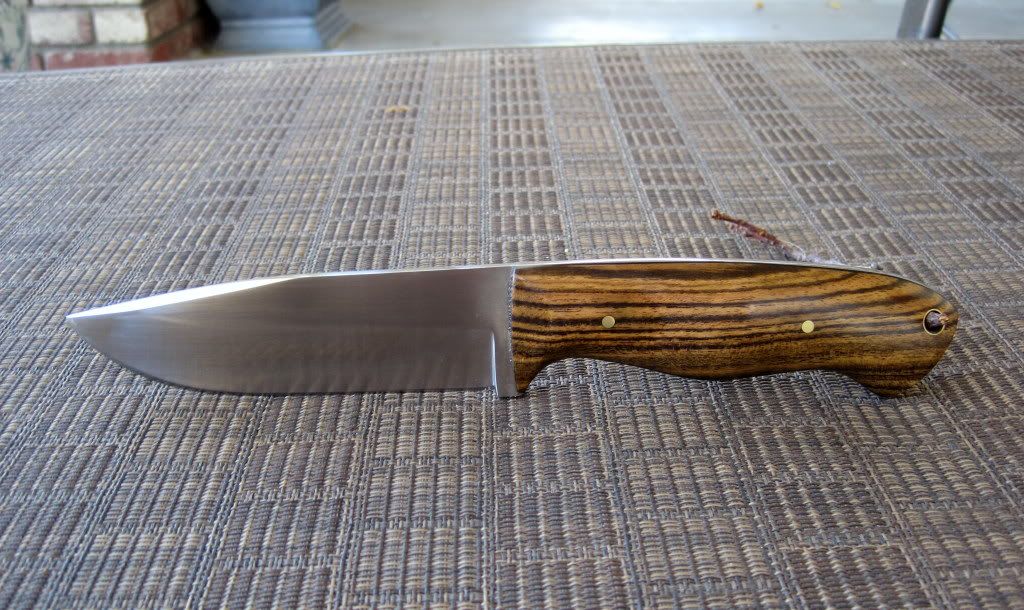
4th knife
Hey everyone this is my fourth knife, second on my craftsmen 2x42. It is 3/16 1080 with bocote for handles. Not to good at taking pictures haha sorry about that. 4 1/2 handle and 4 1/2 blade
Last edited by Atstrickland; 06-11-2012 at 10:27 PM. 
|
|
#2
06-11-2012, 08:12 PM
|
||||
|
||||
|
Looks pretty nice! Hopefully, you take them out and work them hard to see how they hold up. You'll want to be thinking about getting your name on a knife that looks that good ...
__________________ Your question may already have been answered - try the Search button first!   
|
|
#3
06-11-2012, 10:28 PM
|
|||
|
|||
|
Thank you,I am defiantly planning on doing a lot of testing, once i read a little bit more on etching I will hopefully be doing that also.
|
|
#5
06-11-2012, 11:06 PM
|
|||
|
|||
|
A few coats of tru- oil that I had left over with steel wool inbetween coats.
|
|
#7
06-12-2012, 07:11 AM
|
|||
|
|||
|
Tru oil is some great stuff. That knife looks fantastic, great job.
|
|
#8
06-12-2012, 08:22 AM
|
|||
|
|||
|
Nice looking knife. A hint on the photography, dead on like that is probably the worst angle for taking pictures of knives (not too great for people either). Try angling it a little from front or back and from a little above. Another thing you could do is to have the knife propped up on something that will change the angle.
Doug __________________ If you're not making mistakes then you're not trying hard enough
|
|
#9
06-12-2012, 12:27 PM
|
|||
|
|||
|
Ya I really enjoy tru-oil, although I really haven't tried anything else yet. I had a good bit left over from a stock I re finished so trying to use it all up. Thanks for the tips on the picture taking I will defiantly try some of the suggestions you said on my next one I post.
|
|
#10
06-12-2012, 08:26 PM
|
|||
|
|||
|
Atstrickland,
Howdy, this is the most perfect design I can imagine. I was really surprised to see what I consider 'the perfect knife' design. Not only is the blade perfect, the handle is perfect, the size, it is that part of the handle where in the finger guard is, back of the plunge cut, where the handle comes down to make a wooden finger guard. That is soooo... cool, it is beautiful as well as functional. Congratulations. My designs are similar but crude compared to yours. I have found an example of the perfect design I have been aiming at, an inspiring example of a perfect knife in every way. This knife is perfect in another way, as is the photograph. It shows perfectly the 'plunge cut' and 'this type of bevel' which is exactly what I am trying to learn, today! The difference between the flat steel and the bevel is so pronounced a 'line' is visible! I have always wanted to learn that! Obviously one can't do that by eye. There is some kind of guide and 'I gotta get me one'! I have a new #100 grit belt in my grizzly and have clamped two pieces of handle material to the blade as guides. I realize there must be a guide for grinding such a perfect bevel too; for holding the blade at such an exact angle for that type of bevel. If anyone knows what I am trying to say help! I am headed to the store and after words crank the Griz and probably ruin another piece of steel but I am learning. I need one of those guides. How do y'all hold the blade at such an exact angle. Now this is exciting! This is the most important 'knife making related' thing I have to learn. Plunge cut making and beveling. And I just realized basically what it must look like! Something adjustable, braced behind and wider than the grizzly belt which protrudes in front of it to lean the blade against as the beveling is done. Help! Thank you... Jack the Knife Thank you... Jack the Knife Last edited by Jacktheknife; 06-13-2012 at 02:36 PM.
|
|
#11
06-13-2012, 02:13 PM
|
|||
|
|||
|
Thank you for the compliments, I am still really new to this and far more people know more then me . I just marked where I wanted the plunge to begin, did a small bevel to my center line and then started to flatten the spine out more , and to even them out I started rolling the spine into the belt a little more till they were matching. knife handle was held in one hand while the tip rested on my index finger on other hand and my thumb on the back pushing a little into the belt.
Grinding the bevels has by far been the most challenging for me, the angles I would eyeball the distance from the edge to the belt and would try to duplicate the distance every time until they met the edge of my center line, and if I needed to move the bevel up I would move the spine more towards the belt. If anyone else would like to talk more about it I would also greatly appreciate it, can never learn to much. Alex
|
|
#12
06-13-2012, 02:38 PM
|
||||
|
||||
|
Jacktheknife,
Nooooo, Jack - wrong assumption! You're talking about that nice straight grind line on Alex's knife. You'll see grind lines like that on a very high percentage of flat ground and hollow ground knives, just look in any knife magazine. It pains me to break this to you but that is, in fact, done by hand - almost nobody uses a jig or any type of support for that. It takes a little practice but it really isn't that difficult. Plunge cuts are more difficult than clean grind lines, lots of people use file guides for plunge cuts but grind lines are nearly always the product of free hand grinding. One of the biggest 'secrets' to getting clean grind lines is to grind a nice, clean piece of steel with parallel sides. If the steel has even a tiny wave in the surface it gets near impossible to grind a straight line on it. Also, when you get close to a bunch of knives made like that you'll see that even the straightest lines aren't always truly perfect, but they might look that way in a picture ... __________________ Your question may already have been answered - try the Search button first!
|
|
#13
06-13-2012, 04:53 PM
|
|||
|
|||
|
Ray,
The more I mess with making knives the more I respect knife makers. It's hard to believe the perfect grind lines I have been seeing are made by hand. I found two real old files in my 'old file box' both perfectly matched and I am off to clean them up to use as 'clamped on plunge cut guides'. Then using my last four #100 grit belts try and finish the five skinners and stabbers I have on line now. 'Thanks a lot' for your help! Jack the Knife
|
|
#15
06-15-2012, 02:35 PM
|
||||
|
||||
|
Ditto to what Ray said - that is why it is a very good idea for a beginner to use Precision Ground stock to start with.
One other thing - Jack - I see you have a 2x42 grinder, I've got a lot of 2x42 belts that I would let go at a very reasonable price  My 2x42 aparatus busted so I made a buffer out of the motor... My 2x42 aparatus busted so I made a buffer out of the motor...
__________________ Dennis "..good judgement comes from experience, experience comes from poor judgement.." -Gary McMahan, a cowboy poet and good dancer. http://www.facebook.com/home.php#!/p...24112090995576
|
|
| Tags |
| angle, art, back, bee, bevel, blade, design, edge, etching, file, grinding, guard, handle, jig, knife, knife handle, knives, made, make, man, photography, post, steel, tips |
| Currently Active Users Viewing This Thread: 1 (0 members and 1 guests) | |
| Thread Tools | |
| Display Modes | |
|
|


 Linear Mode

