|
|
|||||||
| The Folding Knife (& Switchblade) Forum The materials, techniques and the designing of folding knives. |
 |
|
|
Thread Tools | Display Modes |
|
#46
 05-01-2011, 02:47 PM
|
||||
|
||||
|
I grind one face of each bolster so that when it's mounted the square face will be next to the mating scale.
|
|
#47
05-01-2011, 03:00 PM
|
||||
|
||||
|
This series shows how I locate all the bolsters to match with each other as I spot weld the bolsters to the liners.
The aluminum piece has a slot sawed into it wide enough to accept two liners at once. After the first bolster is welded I place the liner in the marking handpiece with two pins thru the 2 liners to keep them aligned with each other. Then I scribe a line across the next liner to be welded to show exactly where its bolster should be located. After the next liner is marked I carefully place its bolster so that it just comes up to the scribed line, clamp the bolster and liner using a vise grip, and weld it together. This repeats. Place the two liners together in the hand piece, scribe, remove and clamp, and weld that piece, and so on. Last edited by Don Robinson; 05-02-2011 at 10:01 AM. |
|
#48
05-01-2011, 03:04 PM
|
||||
|
||||
|
Now I have to anneal the welds to make them come out the same color as the bolsters.
They are hanging free from a 3/32 pin held in the vise, so they don't warp. Last edited by Don Robinson; 05-01-2011 at 03:16 PM. |
|
#49
05-01-2011, 03:19 PM
|
||||
|
||||
|
The weld spots leave a burr. I remove the burrs by grinding the spot with a sanding disk mounted in a Dremel handpiece.
I do both sides because the next thing I'll do is to drill the pivot pin holes thru the existing liner holes and thru each bolster in each blade pivot hole. Last edited by Don Robinson; 05-01-2011 at 03:22 PM. |
|
#50
05-01-2011, 03:31 PM
|
||||
|
||||
|
The following step is very important.
I drill a small c'bore in the very top of each pin hole in the bolsters. I use the next size up from the drill I originally drilled them with. In this case, I use a #41 (.096) drill. This little drill press has a good adjustable depth stop so that I can drill only into the top of each hole about 1/16" deep. The purpose of doing this is to let the pins swell up only at the top of the holes when I peen them. Note that I've already rough ground the bolsters. When I finish grinding the bolsters I won't grind enough off to remove the c'bores at the top of the pin holes. |
|
#51
05-01-2011, 03:33 PM
|
||||
|
||||
|
The blades and springs have been heat treated, so it's time to surface grind them all the same thickness and remove the as rolled surface.
The strange looking black pieces on each side of the work pieces are Toolmakers hold downs. These are used to keep small parts from skating on the chuck. 154CM isn't as magnetic as plain carbon steels. Last edited by Don Robinson; 05-01-2011 at 03:36 PM. |
|
#52
05-01-2011, 03:41 PM
|
||||
|
||||
|
All right, it's time for you to show us your beginning WIP. Most of you received the design early this week.
Nobody has a question? |
|
#53
05-01-2011, 06:21 PM
|
||||
|
||||
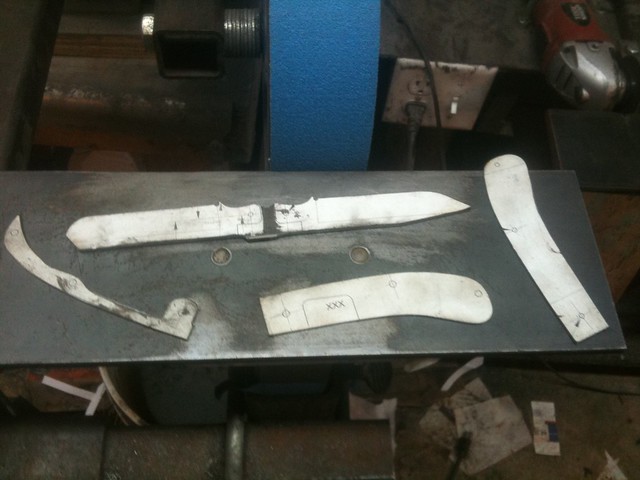 So far I have both outside liners, the inside liner/spacer, and the two blades profiled. I also went head and put a rough grind on both blades so that thay are just about ready for heat treat. I still need to profile the back springs. This would be a whole lot easier if I had a metal cutting bandsaw and a horizontal grinder... hahaha My biggest issue is finding the time to work on this at all, since I'm in the middle of working a 10 day straight rotation at work. That, and my wife is 10 weeks pregnant with twins, so this may take me a while! hahah __________________ -Andrew Riley For the word of God is living and active and sharper than any two-edged sword.... (Hebrews 4:12) My YouTube Channel: www.YouTube.com/ARCustomKnives Check it out and Subscribe! |
|
#54
05-01-2011, 08:00 PM
|
||||
|
||||
|
Thanks for showing, Andrew.
May I offer some critique? I don't know how much experience you have, so I'm going to offer suggestions like I would to a beginner.  1. It appears to me you haven't left extra stock at the kick. You may have trouble setting the blade closed position. Your design warns you to do that very thing. And my WIP. 2. I would never profile anything except the blades and inside of the springs until all the mating parts are fitted. If you rely on the patterns for the hole locations the parts probably won't fit together properly. You simply can't work accurately enough. If you go back thru my recent WIP, you'll see that none of the parts are profiled until after the first assembly with all 3 pins in place. I hope this doesn't upset you. We all learn from constructive criticism. Me too. 
|
|
#55
05-02-2011, 03:11 PM
|
|||
|
|||
|
Don ,
Hope to maybe start soon , but I have a question . When you are preparing to mill your flats [ I will have to hand grind them ] , I can see you have extra metal around your tang , but how close do you profile the blade itself to finish shape ? I would think it would have to be pretty close . Again I will have to hand grind . I`m working this out in my head so I hope it`s not a real dumb question . Thanks , Larry |
|
#56
05-02-2011, 03:23 PM
|
||||
|
||||
|
I profile the blade edge to finished dimension, and leave a little excess stock on the spine so that it will clean up when the knife is assembled and I finish profiling the blade and handle together.
Be sure to leave plenty of stock on the blade kick. |
|
#57
05-03-2011, 02:11 PM
|
||||
|
||||
|
Quote:
If I have to reprofile some blades and liners, that's no problem. I've got plenty of extra blade and liner material right now. So don't worry... I'm not upset at all! I suppose I just need to pay closer attention! __________________ -Andrew Riley For the word of God is living and active and sharper than any two-edged sword.... (Hebrews 4:12) My YouTube Channel: www.YouTube.com/ARCustomKnives Check it out and Subscribe! Last edited by ARCustomKnives; 05-03-2011 at 02:14 PM. |
|
#58
05-03-2011, 09:35 PM
|
||||
|
||||
|
That's great, Andrew.
The design is 100% accurate, but if you try to make the parts one at a time by just following the pattern I guarantee the parts won't fit because you can't follow the patterns accurately enough. Stack them up together on an expendable flat plate as I've shown you. |
|
#59
05-03-2011, 09:36 PM
|
||||
|
||||
|
Has anyone else besides Andrew got anything to show?
|
|
#60
05-03-2011, 10:15 PM
|
|||
|
|||
|
I got a little free time today and cut out all the parts . Haven`t profiled the bottom of blades yet or drilled pivot holes in them and springs are just rough cut as are the liners and spacer . . I don`t know how to post pictures yet , but I don`t really have anything to show that hasn`t been shown .
Larry |
|
| Tags |
| art, blade, brass, fixed blade, folder, heat treat, hunting knife, kit, knife, knife making, knives, pins, post, press, satin finish, scales, supplies, supply, tang, teach |
| Currently Active Users Viewing This Thread: 1 (0 members and 1 guests) | |
|
|
 Similar Threads
|
||||
| Thread | Thread Starter | Forum | Replies | Last Post |
| Got a new 2-blade trapper!!! | Don Robinson | The Folding Knife (& Switchblade) Forum | 14 | 09-06-2011 08:29 PM |
| My 2 blade trapper is done | Don Robinson | Texas Knifemakers and Collectors Association | 2 | 01-29-2007 06:37 PM |
| two blade trapper | sean stewart | The Folding Knife (& Switchblade) Forum | 5 | 06-05-2005 10:44 AM |
| Two Blade Trapper | Morrowknives | The Display Case | 8 | 04-16-2004 08:01 PM |


 Linear Mode

