|
|
|||||||
| Tool Time Let's talk shop. Equipment, Tips & Tricks, Safety issues - Post it here. |
 |
|
|
Thread Tools | Display Modes |
|
#1
 12-02-2012, 09:49 AM
|
|||
|
|||
|
My "Wee Forge"
Hi Everyone
I had posted a pic of my forge setup in the Newbie Forum and I have had a few people request that I post pics of the forge and interior here. I'm a little reluctant to post as the forge is ugly and I messed up the design of the door when I built it. At any rate, I have to say that this is what I built and use, if you choose to stick a burner or torch of any kind in a similar forge, then I am not responsible for any injury or damage that may occur. The forge body is made from a recycled, refrigerant cylinder. I cut out the handle, turned it on it's side and welded it to the lid. I cut the top off the cylinder and cleaned up the edges a bit. This was where I messed up. I needed to cut the top of the cylinder off further down the body to accommodate lining the door with insulation blanket. To hold the door in place I cut a small piece of angle iron and stitched it on as well after cutting a notch in it. The door basically hangs in place. I drilled and tapped three holes in a black iron nipple for the burner port. The holes are for bolts to hold the burner as shown. I used the nipple because that's what I had. A piece of black iron pipe would be easier to drill and tap. Note that I have used black iron fittings. DO NOT USE GALVANIZED PARTS FOR A FORGE. Galvanized parts will poison you when they are heated. I cut a hole in the side of the forge body and stiched the black iron nipple in place. For the feet I stitched on two pieces of angle iron to the body. Aside: When I say 'stitched' or 'welded', I use the terms very loosely. I was given a small stick welder that I had never used until building the forge. So, I had to learn how to used the stick welder. The quality of the welds are not outstanding but the forge hasn't fallen apart yet. Honestly, using the stick welder was a lesson in frustration.  Anything that I used the welder on could be bolted on as well. I used the welder because I had it in my garage. Anything that I used the welder on could be bolted on as well. I used the welder because I had it in my garage.To line the forge, I found a Ceramic Supply place where you buy supplies for pottery and kilns. A few feet of Fibrefax blanket (good to 2200 degrees F) and 5 lbs of high temp ceramic (Satanite is popular but I could not find it in Canada) cost me about $45 (Canadian) so I'm sure anyone in the USA can find this stuff for a fraction of the cost. There are plenty of suppliers for this stuff with a search on the internet. I put two layers of insulating blanket in the bottom and two layers inside the body. Because I buggered up the door I 'glued' two layers of blanket together with the ceramic and then coated any exposed blanket with a thin layer of ceramic to for durability and to keep the blanket fiber from getting into the air. NOTE: I used a safety mask when working with the fiber blanket. So, here are the pics. If you have any questions let me know. I am not a forge building expert. This is my first attempt at building one. There are many videos and instructionals out there. I would recommend check out Ray Rogers site as he has a ton of information about forge building. Also, the pic with my hand in it is just to give some perspective. My hands are not freakishly large or small. The outer dimensions of the forge are 12" long x 10" diameter. The inner dimensions are 9" long x 6" diameter. The torch is a bit small for this inner volume but it works for now. It takes about 10 minutes to get up to temp. [IMG] 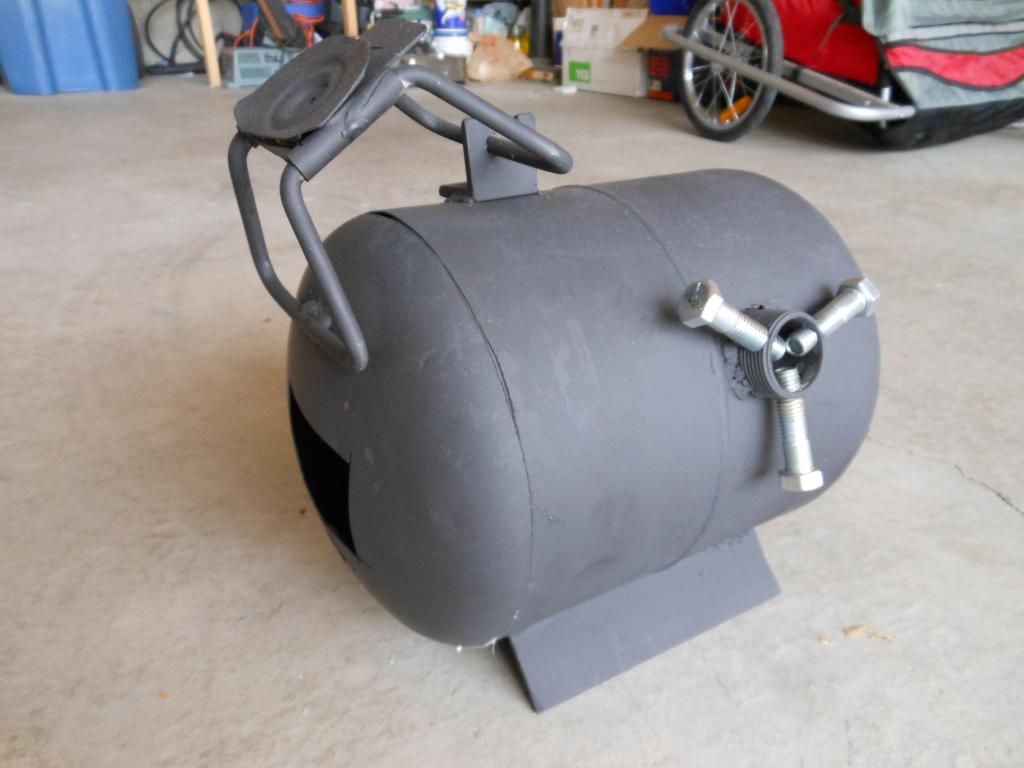 [/IMG] [/IMG][IMG] 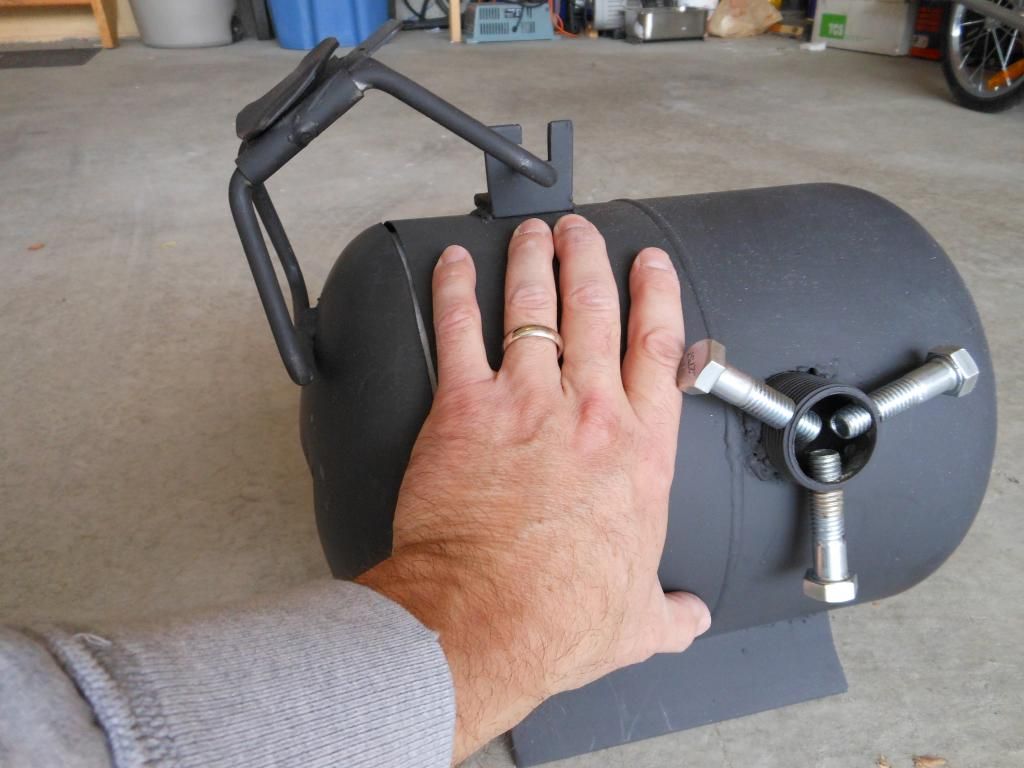 [/IMG] [/IMG][IMG] 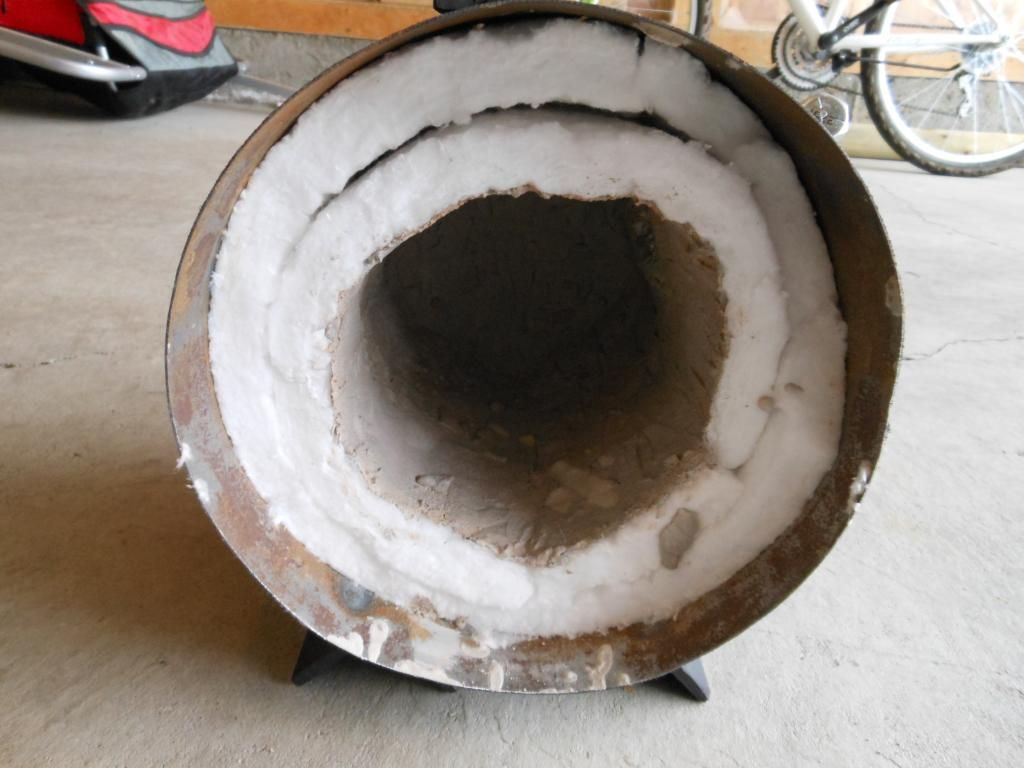 [/IMG] [/IMG][IMG] 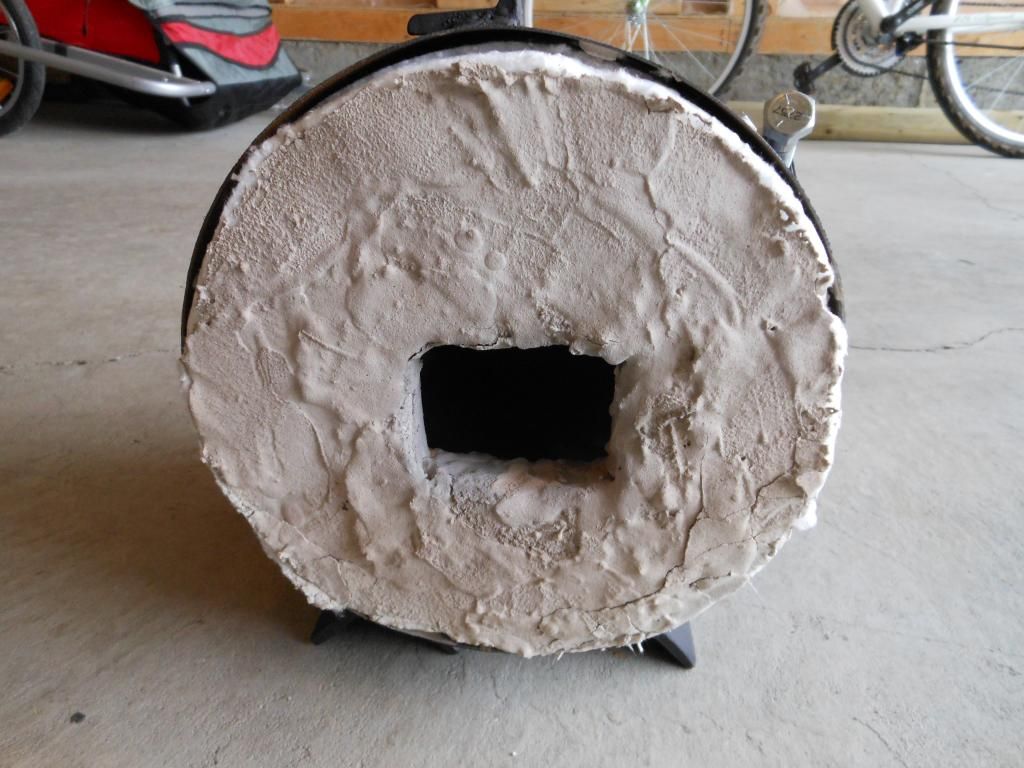 [/IMG] [/IMG][IMG] 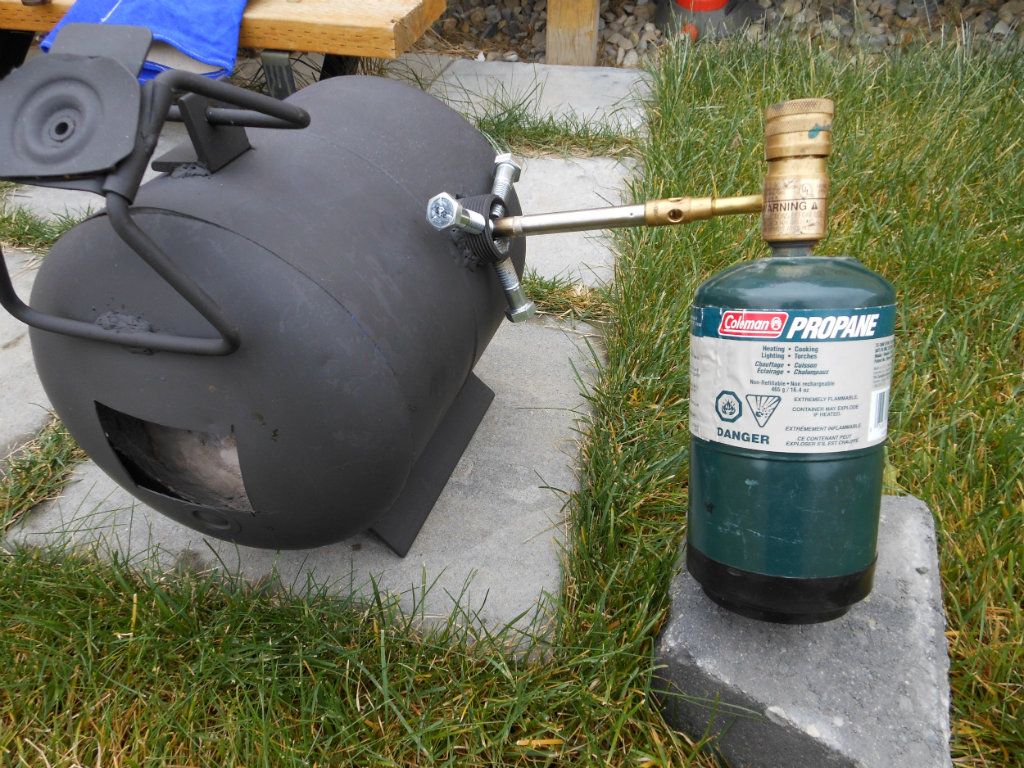 [/IMG] [/IMG][IMG] 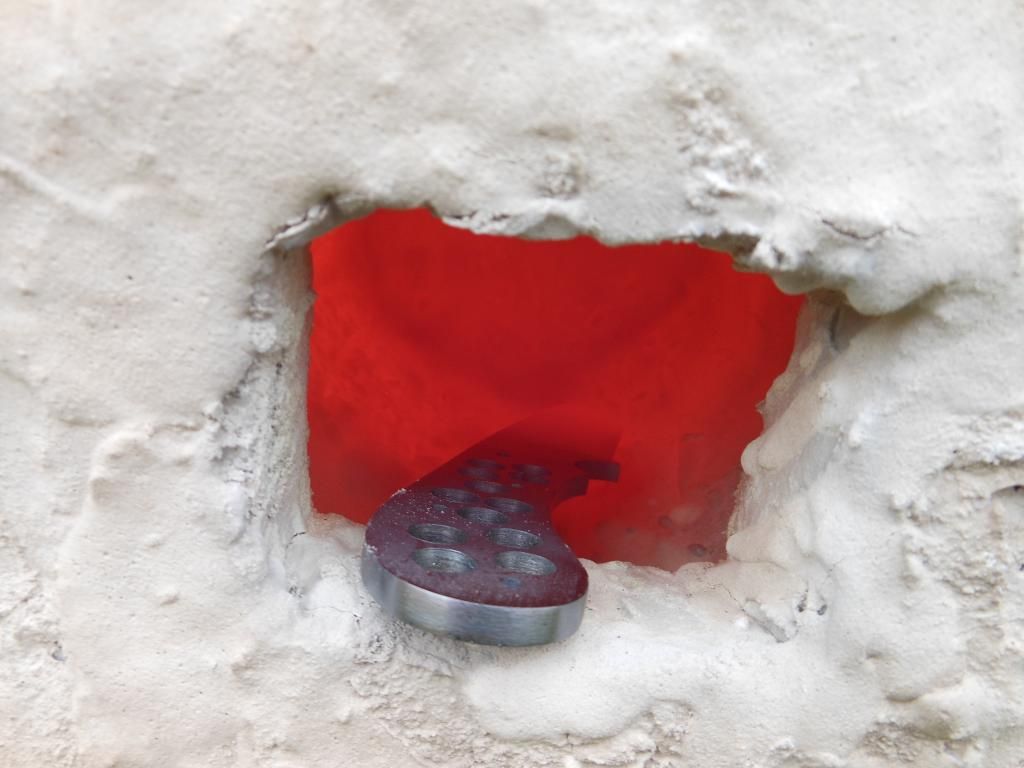 [/IMG] [/IMG]

|
|
#3
12-02-2012, 03:56 PM
|
|||
|
|||
|
Looks good. Try stuffing some ceramic matting around the burner tube to prevent hot gasses from washing back through the burner tube hole in the body and burning up the burner tube. If you are going to leave that pretty much set up in one place you could even use some furnace patch cement. If you allow hot gasses to vent out around that brass burner tube it won't last long.
Doug __________________ If you're not making mistakes then you're not trying hard enough
|
|
#4
12-02-2012, 06:09 PM
|
||||
|
||||
|
Bowman, thanks for putting up the build info and pics. I am going to make my forge out of a similar portable air container. I found a lot of info and supplies on Kelly Cupples website at www.hightemptools.com. I plan on welding some angle iron horizontally above and below a square cut out on one end, and slide in a piece of Insboard I plan on buying from Kelly Cupples.
I guess I can just order Satanite and use that also. I get confused reading all about the other refractory items like Bubble Lumina, Ins-Tuff Rigidizer and ITC-100. Not sure which is best for my intended use. They all seem expensive. I would like to be able to reach a forge-welding temperature for future use. Maybe somebody here has some opinions they would like to share.
|
|
#5
12-02-2012, 07:41 PM
|
|||
|
|||
|
Quote:
I only used the refractory to keep the blanket from releasing fibres into the air and give it a little durability. The different coatings I have no experience with but if I could get it locally I would have tried it. I had spoken to an industrial refractory manufacturer who explained that a forge should be mostly refractory material and a bit of insulation but the more mass you have the longer it takes to heat it up to temperature. For my purpose I don't plan on forge welding and I don't HT a ton of knives at a time, so it doesn't have to run for very long. Best of luck in your build. Post it when you are done.
|
|
#7
12-02-2012, 08:35 PM
|
|||
|
|||
|
Just another thought. You might want to put a pass through port on the back side. It will help you forge longer blades; maybe up to 16-18" long. Actually I have a smaller forge that I use for routine forging and for heat treating smaller blades. It's only 7" deep. You can only work about 4-5 inches of steel at a time so the total length of the blade being forged doesn't matter with the pass through port. Also when heat treating shorter blades I can stick the point out the back and heat up the thicker rear section of the blade ahead of the thinner point and not have to worry as much about overheating it.
You might also want to consider building a blown burner. You can get most, if not all, of the parts you need at a hardware store and they're easier to build than a venturi burner. You do need a blower and a supply of electricity but they are much more flexible but are the way to go unless an electrical supply is an issue. My forges are powered by one of those blowers that power a bounce house. The flow is regulated with a gate valve below the gas intake. The gas flow is regulated by a needle valve which is the only thing that you might have to order online. Doug __________________ If you're not making mistakes then you're not trying hard enough Last edited by Doug Lester; 12-03-2012 at 11:41 AM.
|
|
#8
12-02-2012, 11:15 PM
|
|||
|
|||
|
Doug
Definitely some food for thought. It really wouldn't be much more for me to make a blown burner. I do like the idea of the back door as I did have an issue with the tip heating quickly. I thought I might try heating the blade inside a piece of black pipe the next time around. Thank you for the advice.
|
|
#9
12-03-2012, 10:02 AM
|
||||
|
||||
|
the only thing i see that would have helped you out also is a few more layers of the Refractory on the in side as Flux will burn the light layer you have applied to it .
Sam __________________ R. Yates 13 & On Forge Live and Let Live , Do Not trespass on Life or Me! As we are not so kind or forgiving !
|
|
| Tags |
| advice, angle, back, brass, build, building, choose, design, forge, forging, handle, hot, how to, iron, knife, knives, made, make, material, newbie, notch, post, supplies, supply |
| Currently Active Users Viewing This Thread: 1 (0 members and 1 guests) | |
|
|
 Similar Threads
|
||||
| Thread | Thread Starter | Forum | Replies | Last Post |
| PERU:knife forge"scissors Danzaq" carbon steel | ALEJANDRO | The Display Case | 1 | 08-30-2008 06:40 PM |
| PERU: knife forge " Garza Blanca "carbon steel | ALEJANDRO | The Display Case | 2 | 08-14-2008 09:08 PM |
| PERU: knife forge"albatross wing"carbon steel | ALEJANDRO | The Display Case | 2 | 04-09-2008 03:47 PM |
| PERU: knife forge "llapan Atic"carbon steel | ALEJANDRO | The Display Case | 5 | 02-10-2008 07:56 PM |
| PERU: knife forge "Esquelpes"(fish skeleton) | ALEJANDRO | The Display Case | 2 | 12-22-2007 11:49 PM |


 Linear Mode

